
Veeam Agent for Windows is an incredibly powerful free backup tool, packed with features. However, there are many factors that can affect its ability to carry out backups reliably. In this guide, we will cover some basic troubleshooting steps to diagnose common issues with backup failure.
Troubleshooting Backup Failures
Before we dive into the specific error messages, let’s try some basic troubleshooting first.
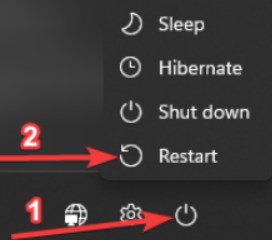
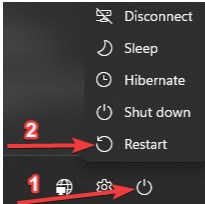
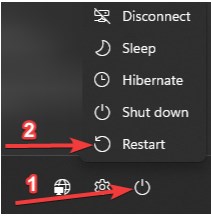
1. Reboot your computer – you can do this by pressing the windows key and clicking the power button then click the restart button.
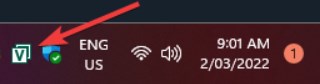
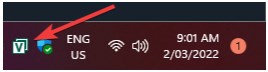
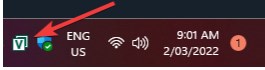
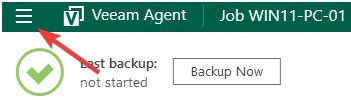
2. Once your computer is up and running, double click the green “V” icon in the taskbar to open Veeam.
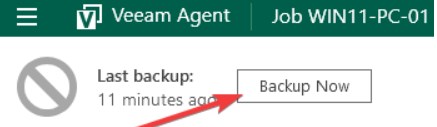
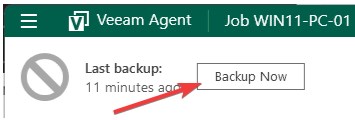
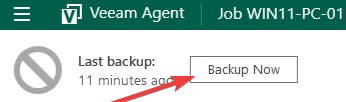
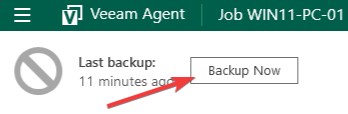
2. Run another backup attempt by clicking the Backup Now button.
If your backup attempt fails, you should receive an error or warning email notification. Please check your email and check for the email notification from Veeam and open it, then you can find the error or warning message on the Details section of the error notification.
Here are the most common errors encountered in Veeam and how to fix them.
Error - There is not enough space on the disk
This means that your backup drive does not have enough space to save another backup. There are multiple ways to resolve this issue, here are a few quick suggestions:
1. Free up some space on your backup drive. Although backup locations shouldn’t really be used for storing other files, it may be worth checking to see if there are other files that can be moved or deleted.
If you don’t know the location of your backup folder, please follow these steps:
a. Double click the green “V” icon in the taskbar to open Veeam.
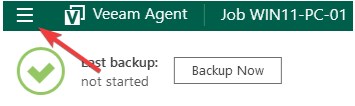
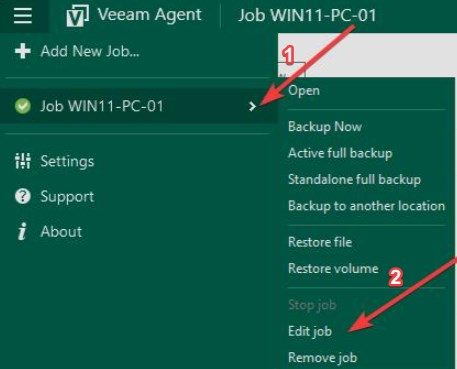
b. Click the main menu button.
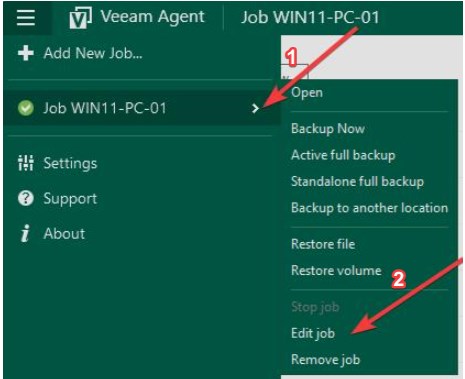
c. Select the backup job by hovering the greater than “>” icon and click the Edit job.
d. Locating the file path of your backups.
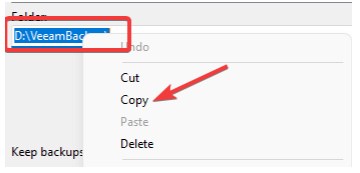
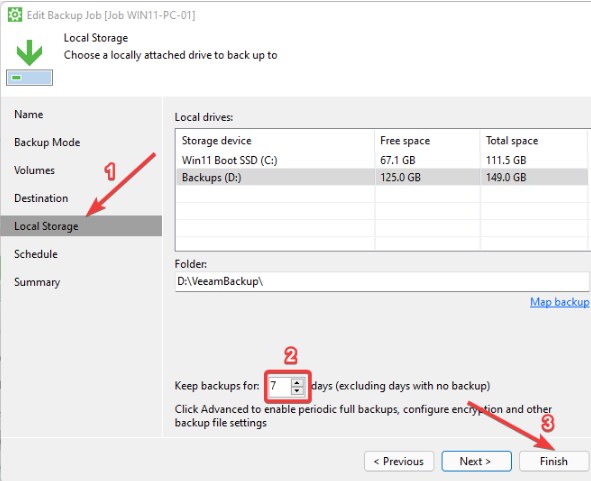
i. If you’re using Local Storage, click Local Storage and copy the file path.
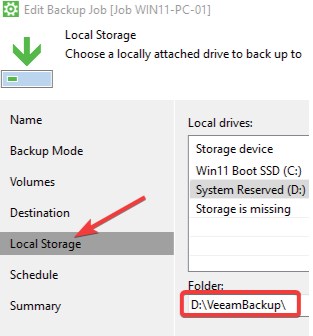
To copy the file path, simply highlight it then right click, and click copy.
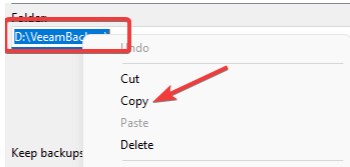
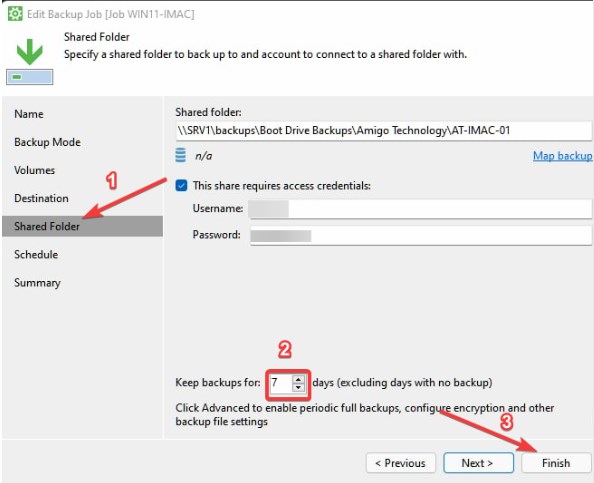
ii. If you’re using a Shared Folder, click the Shared Folder and copy the file path.

To copy the file path, simply highlight it then right click, and click copy.
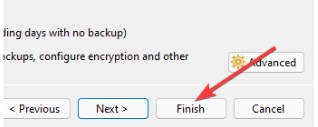
e. Click the finish button to close the Job settings.
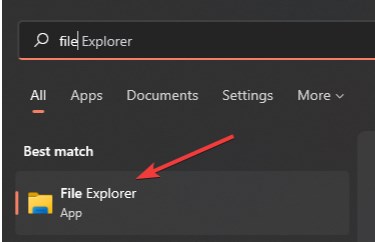
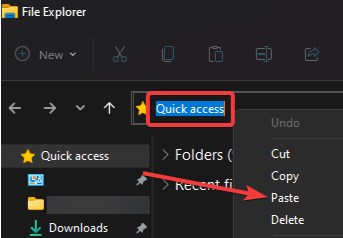
f. Press the Windows key and type “file explorer” then click the File Explorer icon to open the file explorer.
g. Paste the file path to your folder navigation area. To paste it, highlight the current path, right-click it, click paste, and press enter.
h. Once you’re in the backup folder, type “*.temp” on the search bar to filter the files that can be deleted, and press enter.
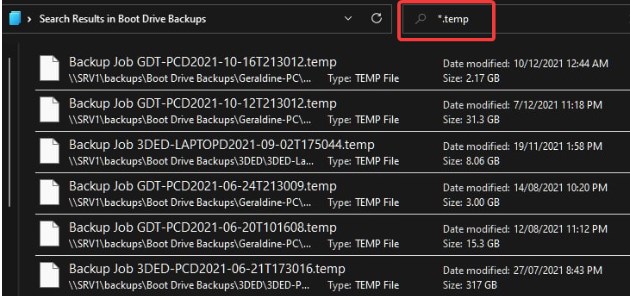
i. Select all of the temp files, and double check the files that you’ve selected to make sure that there are no other files selected except for the temp files, then press the delete button to delete them.
j. Go back to Veeam, and click the Backup Now button to start the backup process.
2. Adjusting your backup retention settings – If you’re keeping your backups for way too long, chances are it’s gonna take up some space, especially if you’re running the backup process multiple times per week. To free up some space for your backup drive, reduce the number of days of your backup retention between 7-15 days. This will allow Veeam to automatically delete/remove backups that are no longer needed and it will save up some space for new ones. To do this, please follow these steps:
a. Double click the green “V” icon in the taskbar to open Veeam.
b. Click the main menu button.
c. Select the backup job by hovering the greater than “>” icon and click the Edit job.
d. Set your backup retention. Depending on how many days you want to keep your backups. We recommend keeping the backups between 7-15 days. By doing this, Veeam will just keep the most recent backups you have and automatically delete the older ones to free up some space for the new ones.
i. If you’re using a Local Storage, click the Local Storage and set the Keep backups for.
ii. If you’re using Shared folder, click the Shared folder and set the Keep backups for:
ii. On Veeam, click the Backup Now button to start the backup process.
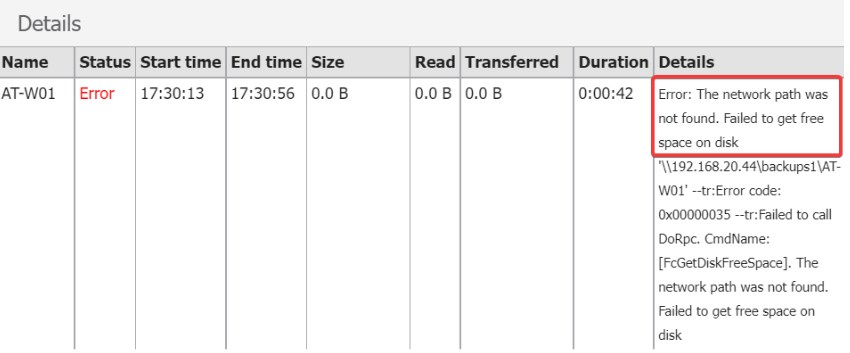
Error - Backup target is not available
It’s highly possible that your backup destination is disconnected.
If you’re saving your backups to an external hard drive, please make sure that it’s connected to your computer, if it’s connected, please reboot your computer then run another backup attempt. It’s also possible that the current port you’re using is not working properly, so it’s also a good idea to try connecting it to a different port.
1. Reboot your computer – you can do this by pressing the Windows key and clicking the power button then click the restart button.
2. Once your computer is up and running, double click the green “V” icon in the taskbar to open Veeam.
3. Run another backup attempt by clicking the Backup Now button.
If you’re backing up to a shared network location, please check your network connection, and make sure that the backup server is running. If it’s currently running, please restart your computer then run another backup attempt again.
If you’re still getting an error after making sure that the connection is working, then please reach out to us so we can further check this for you.
Error - Failed to read data from the file
This is most likely an issue with your disk drive. There are multiple ways to check hard disk health using chkdsk, or a 3rd party application, like CrystalDiskInfo however, this is very time-consuming, instead, we do recommend reaching out to us so we can assess it for you.
Error - The system cannot find the file specified
The issue is most likely related to your backup destination. It’s possible that the was some recent changes to your backup destination, eg. you’ve renamed the folder, change the drive letter, or simply the destination no longer exists. If this is the case, please get in touch with our support team to set up a remote support session and we’ll go from there. Thanks!
Error - A VSS critical writer has failed
It’s possible that there’s a conflict between Veeam and other 3rd party applications installed on your computer, or a hardware issue. In this case please follow these steps:
1. Reboot your computer – you can do this by pressing the windows key and clicking the power button then click the restart button.
2. Once your computer is up and running, double click the green “V” icon in the taskbar to open Veeam.
3. Once your computer is up and running, double click the green “V” icon in the taskbar to open Veeam.
If you continue getting an error, please reach out to us so we can further check this for you.
Error - Storage I/O issue - Corrupted data
It’s most likely that your backup drive is corrupted or there’s a corrupted data on your backup drive that’s causing this error. Either way, this requires an immediate action, please get in touch with our support team to set up a remote support session and we’ll go from there. Thanks!
Error - Something else?
If you are getting another error message, then there is a good chance that the problem could be a little more serious and may require us to take a closer look. If this is the case, please get in touch with our support team to set up a remote support session and we’ll go from there. Thanks!
Installing Veeam Agent for Windows
Installing from Veeam Agent for Windows is fairly straightforward. There are two methods to do this:
Method 1 (Recommended) - Install via Chocolatey
The easiest way to install Veeam Agent for Windows is to do the following (assuming you are on a recent Windows 10 system):
1. Open the Windows Search (bottom right hand corner) and type in “PowerShell”. On the option that appears, right click on “Windows PowerShell” and select “Run as Administrator”.

2. Once you have Windows PowerShell running as an administrator, copy and paste the following command into the terminal window (CTRL + C to copy, CTRL + V to paste):
Set-ExecutionPolicy Bypass -Scope Process -Force; [System.Net.ServicePointManager]::SecurityProtocol = [System.Net.ServicePointManager]::SecurityProtocol -bor 3072; iex ((New-Object System.Net.WebClient).DownloadString(‘https://chocolatey.org/install.ps1‘)); choco install veeam-agent -y
That’s it! After a few moments, Veeam Agent for Windows should be installed.
Method 2 - Install via Veeam Website
This is the official method to install Veeam, but requires jumping through a couple of hoops to get started. Veeam offers a variety of paid software and support, and to get access to the installation files, you need to register an account on veeam.com to be able to download and install software. Click here to register and download: https://www.veeam.com/windows-endpoint-server-backup-free.html
Once registered, you should be able to download and run the installer files from the Veeam portal.
Create Bootable Recovery Media (Optional)
Before we go to the effort of setting up backups, it is recommended to create bootable recovery media, just in case you are unable to boot your system and you wish to restore it yourself. To do this, we will want to install recovery media to a USB flash drive that is at least 4GB in capacity.
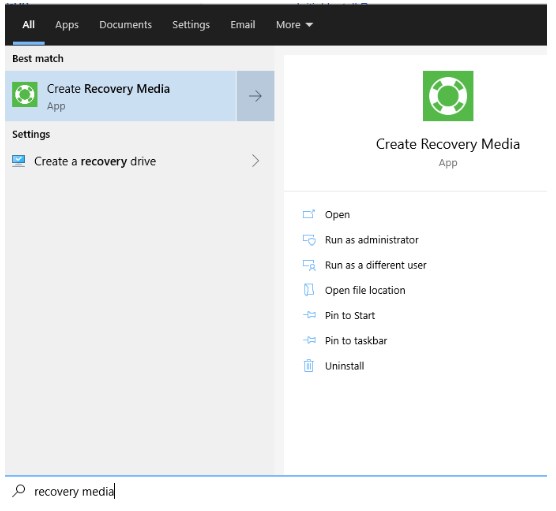
1. To get started, open Windows Search and typing in “Recovery Media”. You should see an item with this green icon appear – click it to run.
2. Once you run the application, you should be greeted with the following Recovery Media wizard. Select the USB flash drive and click “Next”.

3. After a few minutes, your recovery media is ready!
Running Veeam Agent for Windows for the First Time
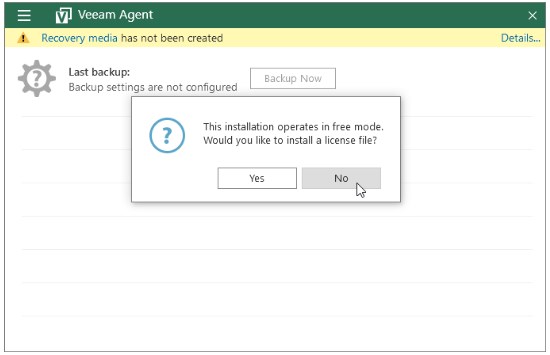
When running Veeam Agent for Windows for the first time, you will be prompted to install a licence file – click “no”, as we want to operate in “Free” mode, which is enough for basic use.
Basic Setup
Follow these steps to create a recommended backup for backup data environments:
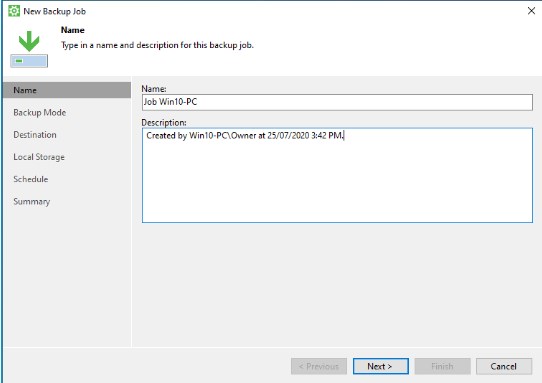
1. Open Veeam Agent and click the 3 lines icon for more options and select ‘Add New Job’
2. Give the backup job a unique and suitable name and click next.
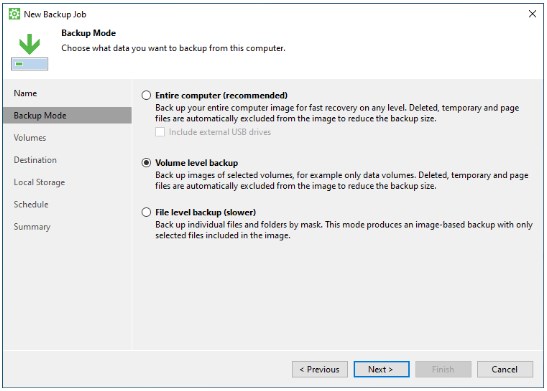
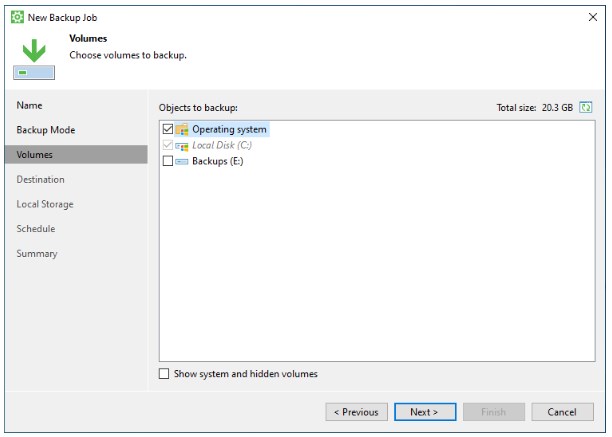
3. Here you can choose between a volume level and full system backup. Unless you want to backup all of the drives in the system to a network share or USB hard drive, select Volume Level backup. Folder backups are not recommended unless you only care about specific sections of your system and have limited backup space.
4. Assuming you selected Volume Level Backup, select the drive you want. Hidden system partitions get selected automatically.
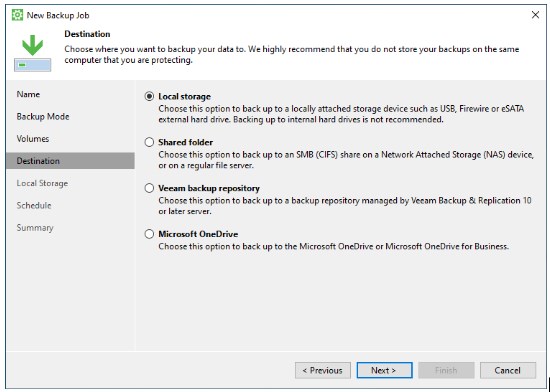
5. Choose a destination. If you are backing up several systems to a single share, then ensure that you create a folder for each workstation. If you are backing up to an external drive, make sure the drive is manually assigned to a unique drive letter, preferably R:\ for Recovery.
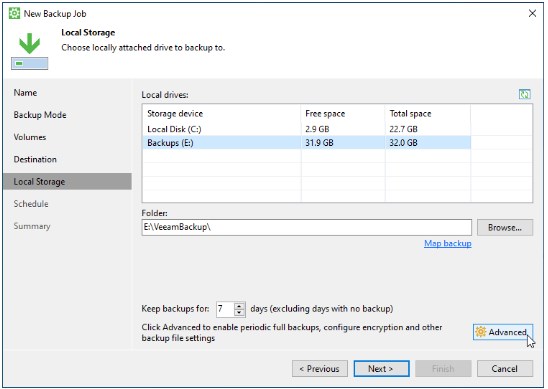
6. Configure the destination. Changing backup retention is recommended unless you have very tight storage requirements. The recommended duration is 5 days. General rule of thumb – for each GB of storage that needs to be backed up, you should have 2GB of storage for backups. If you don’t have enough room, drop the recommended duration to a lower number.
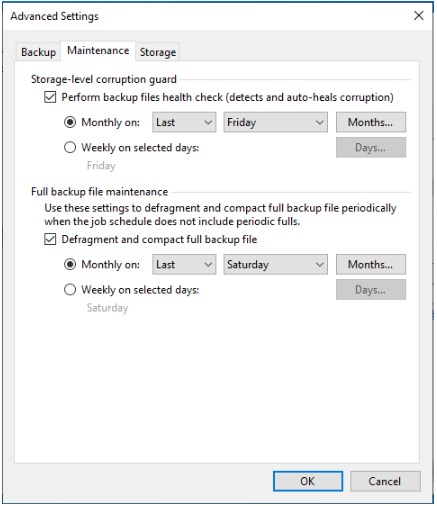
7. Before advancing to the next section, click on “Advanced”.
a. Go to the maintenance tab.
i. Enable “Storage-level corruption guard”. This will ensure that backups aren’t corrupt. It will run once a month by default which is fine for most systems, but once a week is preferred for mission critical systems.
ii. Enable “Full backup file maintenance” Monthly defragmentations are fine, although you may want to set this to weekly if you have a short backup retention time (eg. 2 weeks).
b. Go to the Storage tab
i. Set the compression level to a level that is appropriate to your system. For laptops that are portable, and for lower-end PCs, the “optimal” setting is fine for most. If you have a high performance system that does not run on battery and backup runtimes are not an issue, then set the compression level to “high” to reduce storage requirements.
ii. Set the storage optimisation setting. This is pretty self explanatory, but it does result in additional optimisations for various connection types (eg. LAN, WAN, etc).
iii. Enable encryption if required. This comes down to the sensitivity of the data (eg. financial records).
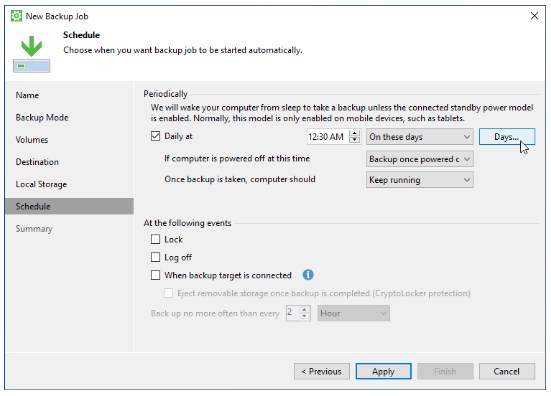
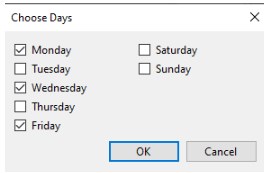
8. Select an appropriate time and day. If possible, try to avoid multiple systems are backing up to the same share at once, and select times that are least likely to impact performance on workstation. For most systems, it is recommended that 3 times a day is a good standard, but for mission critical systems, then daily backups are required.
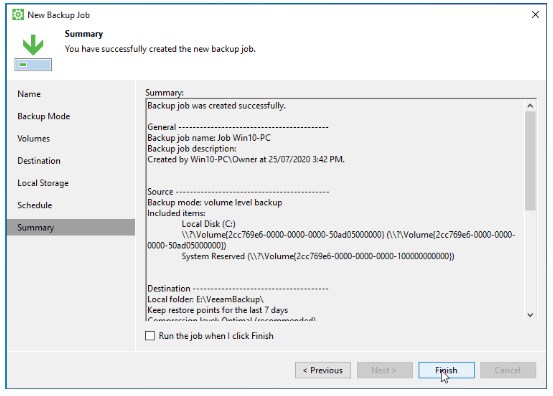
9. Click next and finish, but don’t run the backup yet.
10. Open Veeam Agent again, and click on more options then settings.
11. Enable Email Notifications. Click on “Configure and Test” and then add your desired email address to the first text field. Leave the password field blank for now.
12. Select Notify on Warning and Error and deselect success (unless you want an email every time a backup occurs)
13. Under SMTP server settings enter smtp.google.com, 587, [email protected] and tick ‘Use secure connection.
14. Before clicking test, we will need to provide your unique password for email notifications – So feel free to email us on [email protected] or call us on (07) 5408 4607.
15. Click Test Message to confirm the settings are correct.
16. Done!

Diagnosing the Fault
While the backup failure notifications can help point you in the right direction, they are often generic or cryptic and refer to processes specific to Veeam. So following these processes should help eliminate some variables and narrow down the list of possible causes:
Basic Diagnostics
1. Check the Veeam client for updates, often the latest update will resolve common backup issues.
2. Check Windows for pending updates. Occasionally issues with the Windows environment can prevent backups from working correctly.
3. When was the last time the system was restarted? Rebooting the system will often resolve common backup issues.
4. Is your backup drive detected by the system? If you use a backup drive that is physically connected to your computer, open your file explorer and go to “This PC”. If your backup drive is not in the list of local disks, check to see check that your drive is connected properly and in the correct port. Additionally, try another cable. Veeam can’t backup to a drive that isn’t detected by the system.
5. If your backup drive is physically connected, and the drive is being detected, check the S.M.A.R.T. diagnostic information using CrystalDiskInfo. A copy of this software is in your Power User Tools folder, located in the root of your C:\ drive, or online here. If the disk has any errors and is showing “caution”, then this is the likely culprit.
6. After running through this list, try running a manual backup to see if the issue is resolved.
Low Disk Space
1. Open Veeam control panel by double clicking the green V icon in the taskbar.
2. Click on the 3 lines icon in the top left corner.
3. Hover over the Backup Job option and a second context menu will open.
4. Select Edit Job.
5. Wait for the program to load.
6. Make a note of your configuration settings, as these may be required when setting up the new backup profile.
7. When you have finished noting down your configuration, click cancel to return to Veeam’s control panel.
8. Repeat steps 2 and 3, however this time select remove job.
Open file explorer and navigate to your backup directory.
10. Delete the folder.
11. Open Veeam’s control panel again.
12. Once again, click the 3 lines icon and select Add New Job.
13. Proceed through the backup config and restore your previous settings with the exception of Keep Backups For x Days, which you should set to 5 or lower depending on your needs and the limitations of your backup disk..
14. If you are unsure whether or not you have configured your backup correctly, compare your configuration to the instructions Basic Setup to ensure it is correct.
15. When you have finished restoring the backup configuration, run a manual backup to ensure the issue has been resolved.
Advanced Diagnostics
If, after completing the list of basic diagnostic steps the issue still persists, a more advanced and situation-specific diagnosis is required. This will warrant the attention of a technician. Feel free to email us at [email protected] or call us on (07) 5408 4607 to organise a support session.
Restoring a Backup
Restoring a backup using your Recovery Media can be daunting, but it doesn’t have to be so. If you have a computer that is failing to boot for any reason (eg. after a bad shutdown or Windows update), then you can restore your backup and hopefully get things back to normal.
1. Begin by powering off the affected PC, and plugging in your bootable USB recovery media.
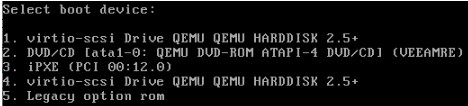
2. Power on your PC, and immediately start repeatedly pressing the boot menu key (on most PCs, it’s the F12 or Escape key, but often you can press delete or F2 to go to the BIOS and do a one-time boot from there – more information on this coming soon)
3. Select your USB flash drive from the list (it should appear as “VEAMRE”).
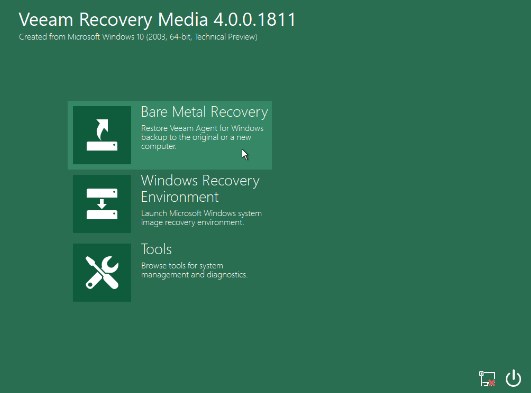
4. Your system should now boot into the Veeam Recovery Environment. Select “Bare Metal Recovery” from the menu.
5. Veeam will now prompt for a backup location. If your backup isn’t immediately detected, click “Load Driver”, otherwise go to step 7.
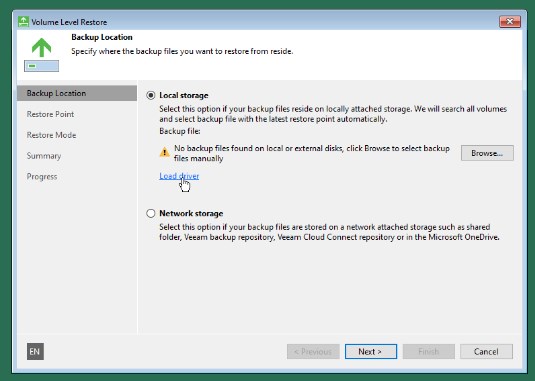
6. Click “Install Driver” for any devices that allow you to. It will take a moment to load, then press OK.

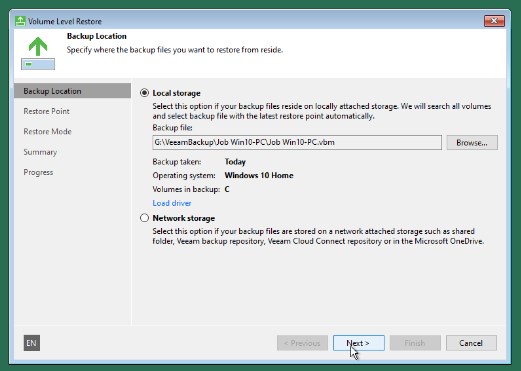
7. Hopefully at this point it should now show your local backup. If not, click browse and locate it manually. Click next to continue.
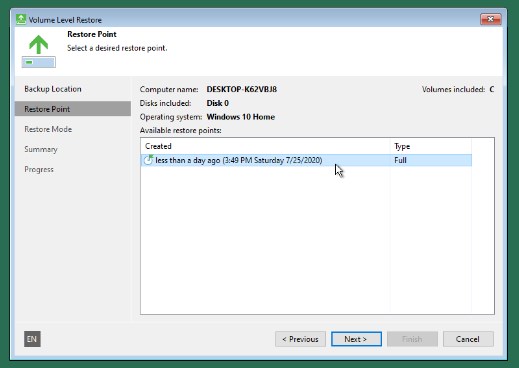
8. Select the restore point you wish to restore. Usually the most recent is the one you want, but you may need to go back and try older backups if you continue to have issues.
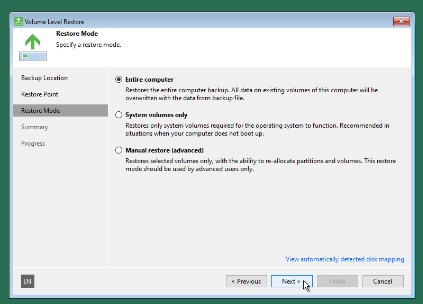
9. If you have a simple backup system (eg. A single boot drive backing up to a single data drive) then you can click “Entire Computer” and it should just do everything for you and you can skip to step 16. However, if you have replaced your drive, or you have a slightly more complex setup, you may get the error message seen below, and we need to do a manual restore.
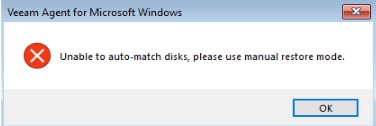
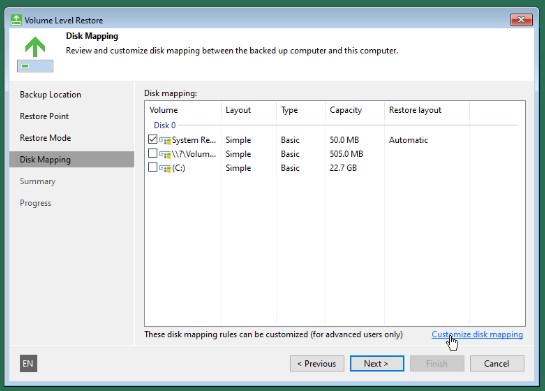
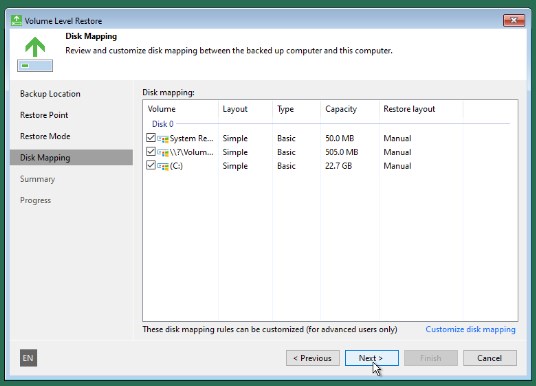
10. Select “Manual Restore” and click next, and you will get the following screen. From here, click on “Customize Disk Mapping”.
11. From here, identify your boot volume. Boot volumes from Windows 10 version 2004 or higher will have three partitions, with one being a “System Reserved” partition which manages the boot process, one primary partition “C:”, and one recovery partition which contains tools to repair the system in the event of boot issues. Remove all three of these partitions by right clicking on each and clicking “Remove”.
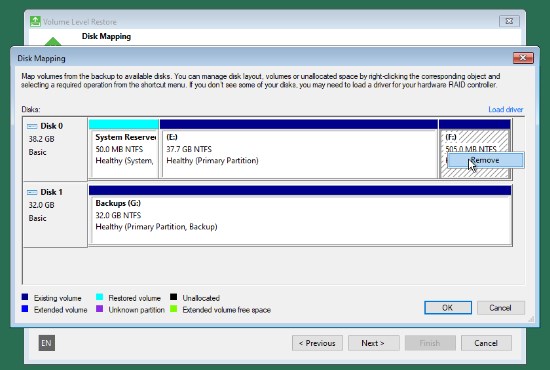
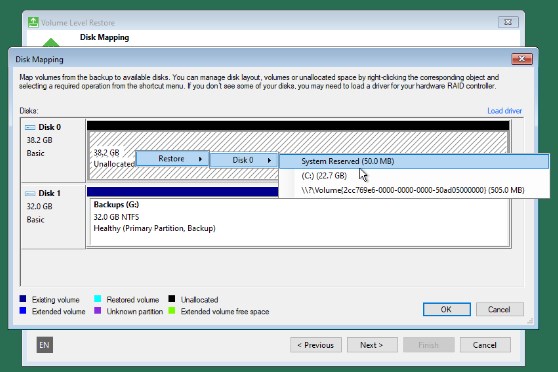
12. We can now manually restore our backup to the unallocated area by right clicking and select “Restore”, and resize our partitions if needed. Begin by restoring the “System Reserved” partition.
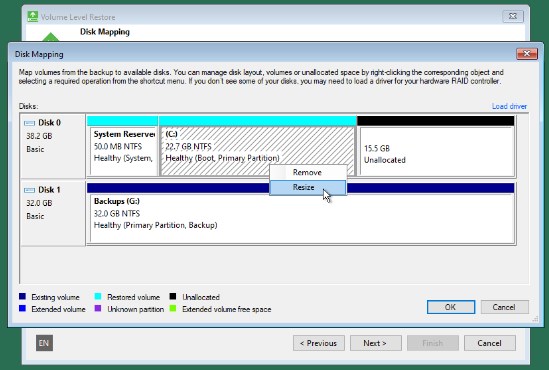
13. In our example here, our replacement disk is actually larger than our original disk. This means that in order to use the full amount of storage available, we need to resize the primary partition. Right click and restore the primary “C:” partition, and then right click on the restored partition and select “Resize”.
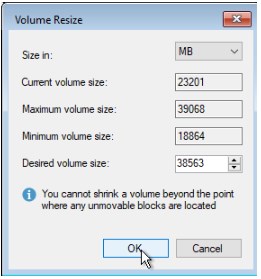
14. From here we need to manually enter the correct, enlarged size of our partition, in order for our third recovery partition to fit. To do this, simply take “Maximum Volume Size” (39068) and subtract the size of the recovery partition (505). This means we can resize this partition to be 38563MB, and still have room for the recovery partition.
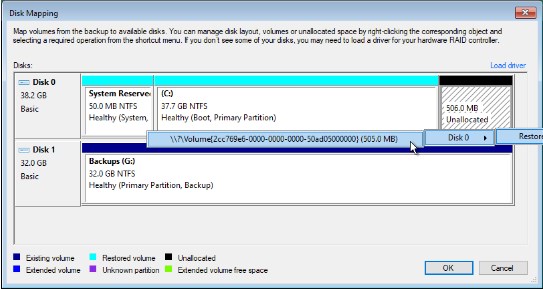
15. Restore the last partition, and then click OK.
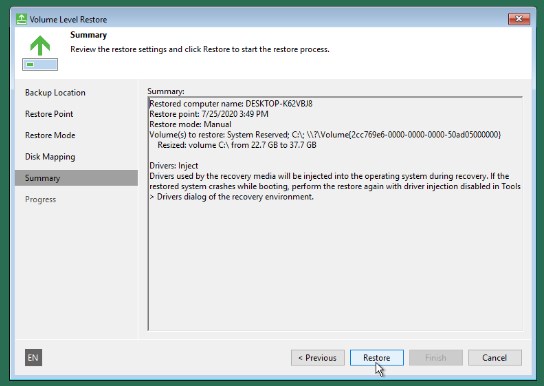
16. Almost done! Click next, and then restore, and your system will recover the backup!
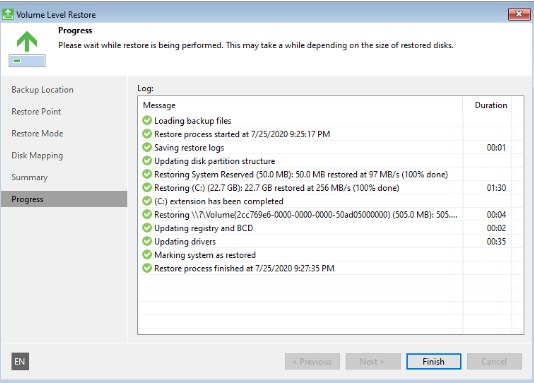
17. That’s it! Click Finish, and your system should now reboot. Remove the bootable recovery media and it should boot from your primary hard drive.