
As smartphones have become an essential part of how we use technology every day, we have come to rely on our data being quickly accessible and secure. There are a few best practices that should be followed to make sure that migrating your data and setting up your device is simple, easy and minimises the risk of data loss. This guide will include details on how to make sure the following is securely backed up and setup on your device:
1. Contacts
2. Photos
3. Calendars
4. Notes
5. SMS / MMS / Messaging Apps
6. Email
7. Passwords and Two-Factor Authentication Codes
8. Apps & settings (eg. Hotspot Settings)
9. Home Screen Layouts
10. Files and other items
Assumptions
Before getting started, we assume you have a few things in place. If you do not have these items covered, please do so before using this guide:
1. Your device is operating properly and has access to Wi-Fi, or at minimum, a mobile data service with plenty of data available
2. Your device has at least 2GB of storage space available. If your device is completely full, consider uninstalling large apps temporarily (eg. Facebook, Reddit, YouTube, or any games that can be easily re-downloaded later) in order to make the backup and setup process smooth.
3. You have a Google / Gmail Account signed in on your Android device (or Apple ID for iPhone), and you know your username and passwords to all the accounts on your device.
4. Your account is syncing without issues. To check this, go to Settings -> Accounts and check that there aren’t any sync issues.
5. If you do not have the password to the Google account (or Apple ID for iPhone), you may need to reset it. If you are unable to reset the password, do NOT remove the account – doing so may remove important contacts or calendars that may not be retrievable. Contact us if this is the case.
Backing up Data on Android Devices
Contacts
The first and probably the most important thing to check is to see how contacts on a given device are set up. Most users don’t understand the importance of contact management and will often just save it to the device or a sim card without thinking too much. This is a problem. If your contacts are being stored on the device’s internal storage or on a SIM card, rather than in an account, then they are at risk of being lost. If your device is reset, fails, or is lost, then it is highly likely that you will be unable to retrieve your contacts..
However, if you have them saved to an account, they can be easily transferred from device to device without risk of loss. If this is the case, you can skip to the next section
Syncing Contacts on Android Devices
If the existing device runs Android, you’ll find that it is pretty simple to migrate contacts, and it should be fairly intuitive. I won’t provide a step by step guide since it can vary significantly between devices, but this guide will cover the essential concepts.
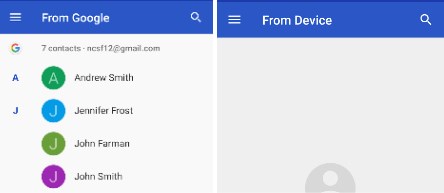
1. Check to see where contacts are saved. Contacts can be saved either within an online account (eg. Google / Gmail / Outlook / Microsoft365), on the SIM, or on the phone itself.
a. To check where contacts are saved, open the contacts app, and open the menu. From here you should be able to choose to only display contacts from a specific account, or all contacts.
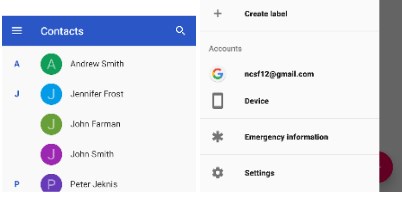
b. Select each group of contacts and see what is stored under that account.
2. If you need to migrate SIM contacts, go to menu -> import from SIM.
3. If you need to migrate contacts on the device, then there are two ways of migrating these. Some devices will allow you to import the contacts from the device to a Google Account directly, but other devices do not. If you can’t perform a direct migration, the best option is to change the contacts to display as “device only” and then select all and “export to SD card”. Once you’ve done that, you should be able to “import from SD card” into your Google Account.
4. Once you’ve finished migrating contacts to your Google Account, you will then want to change the contacts to display to your Google Account, otherwise you will probably see a few duplicates. For example, you can do this, by going to https://contacts.google.com for Google / Gmail accounts, or https://outlook.live.com/people/ for Microsoft Accounts
5. You may also want to clean up duplicates. To do this, log into the Google Account and firstly check that all the contacts have migrated across. It can sometimes take a few minutes to come across, but it is good to ensure that sync is working – nothing worse than “migrating” to Google only to find out that your contacts never synced due to a sync error. It’s also not uncommon to have a couple of duplicate contacts in your Google Account. If you log into https://contacts.google.com you can merge duplicates easily. More info on merging contacts here.
Photos Migration
Photos are also a form of user content that people really hate to lose, especially as cameras improve on smartphones and people no longer use a standalone camera.
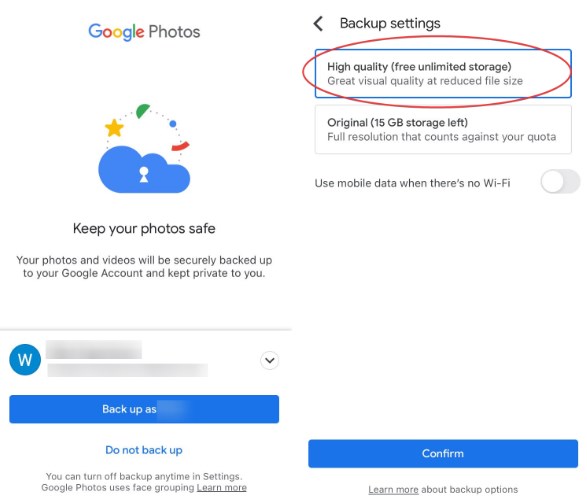
There are a few ways to migrate your photo library to your new device, however google photos is our chosen method:
1. Setup Google Photos on the old device and let it backup your photos in “High Quality”. This ensures a simple ongoing backup of photos on their devices, and has unlimited storage for free using the High Quality option. Setup google photos on the new device and all photos will automatically become available on both devices, once it has had a chance to sync. Additionally, this will allow you to view and manage your photos on almost any device with an internet connection.
2. If for some reason you cannot use Google Photos, you can manually copy across photos to a computer, and then copy it across to the new device. However this is less effective, as this way photos are not being backed up, nor can they be accessed from any other device than your phone.
3. Alternatively copy photos to the SD card of the old device, and then move this SD card into the new device (if possible).
Calendar Migration
Appointments, birthdays and other events are important items for people and it sucks to lose them. If you do have calendars but they are all synced with Google Calendar or Microsoft Outlook, just login to the new device and off you go.
In the case that your calendars are not synced with Google, you will need to find a way to export these to either a .ical or .csv (outlook) data file to be imported into https://calendar.google.com. To import your data file to Google Calendar, consult this guide here.
Notes / Memos
Mobile devices make great note taking devices. If you are using an app that syncronises your notes to an online account (such as our recommendation, Google Keep, which automatically syncs to your Google Account and is accessible via https://keep.google.com/), then you shouldn’t need to do much – all your notes will appear once you get going again.
Unfortunately, many note taking apps are quite limited in terms of exporting or syncronising data. Samsung Notes (also known as Memos) will not backup or sync notes unless you sign in with a Samsung Account. Even once you do, there isn’t a web interface you can view them from (at the time of writing), and you’ll need to be using a Samsung Device running Samsung firmware to be able to restore your notes.
In these instances, you won’t have much choice other than to manually copy and paste your notes across platforms.
SMS/MMS/Call Log
Keeping your SMS has become increasingly important due to two-factor authentication (2fa) and keeping your conversation history can be handy. Fortunately, it is fairly simple with SMS Backup & Restore.
Backing up SMS/MMS/Call Log with SMS Backup & Restore
SMS Backup & Restore is a fairly simple app and most of the settings can be left at default, however there are a few things we recommend for an optimal experience.
1. Download SMS Backup & Restore from the google play store
2. Open the App once it has finished installing and allow all permissions requested
3. Tap Get Started then Set Up a Backup
4. Messages and Call logs should be set to be backed up by default
5. We recommend using Google Drive as your backup location, however DropBox and Onedrive will work too. Do NOT use your phone as a backup location. We will continue under the assumption that you have used Google Drive.
6. Log in to your Google Drive account and select ‘Only access to files and folders opened or created with SMS Backup & Restore’ then press save.
7. Check “Delete Permanently” for deleting backups older than 30 days, otherwise it may fill up your Google Drive storage
8. Press next and select your backup preference. For most people we recommend weekly, however if your text messages are vital, then daily is a better option. Note, if you select daily and tap on the time underneath, you can choose to backup after a specific amount of days.
9. Now go to settings>backup settings and toggle on ‘Archive mode’ as this will conserve space on your device/google drive. It adds new data to a single backup file rather than creating a new full backup file every time. Handy!
Restoring SMS/MMS/Call Log with SMS Backup & Restore
Restoring SMS/MMS/Call Log to your new device is even simpler than backing it up.
1. Download SMS Backup & Restore from the Google Play Store.
2. Once the app has installed, open it and allow all permissions requested.
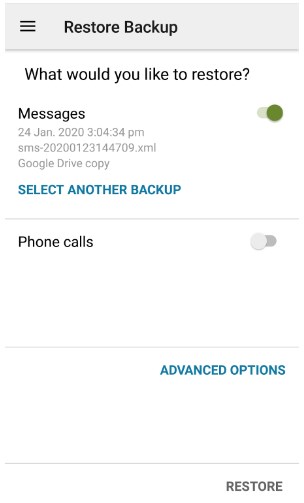
3. Tap on the menu button in the top left, and then tap on “Restore”.
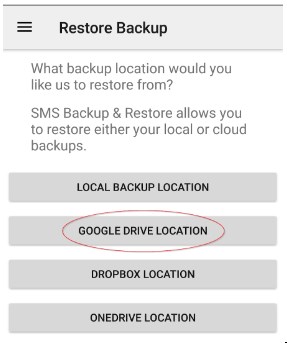
4. You will now be prompted to choose where to restore from. For more, you will want to choose Google Drive (assuming that was the storage location you chose in the backup process).
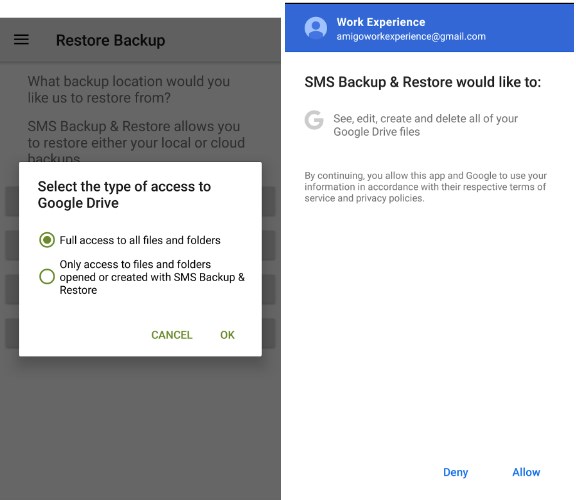
5. Log in to your Google Drive account and select ‘Full Access to all files and folders’ then press OK. If it prompts for Google Drive Permissions, tap “Allow”.
6. The app will then scan your Google Drive for backups. If there is only one file, it will be selected automatically, otherwise you can manually select a backup from a specific time and day. You can also opt to restore your call logs if needed. Once you are happy with the selection, tap “Restore”.
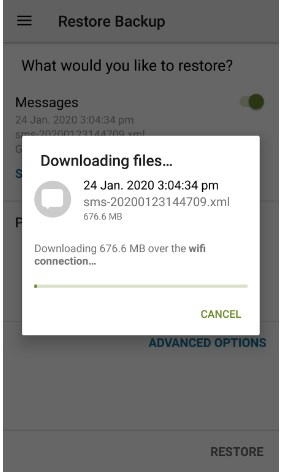
7. The app will then download your backup – this will take some time, especially if you have a slow connection or a large backup.
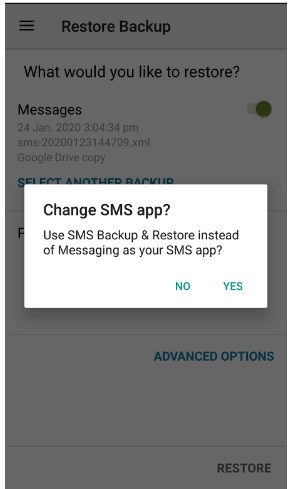
8. Once the files have downloaded, you will be requested to switch the default sms app to SMS Backup & Restore temporarily, so that it can complete the task. Simply press “OK”, and then then “Yes”, when prompted.
9. At this point, the restoration process will now begin. This process can take hours – DO NOT SWITCH OFF YOUR DEVICE!
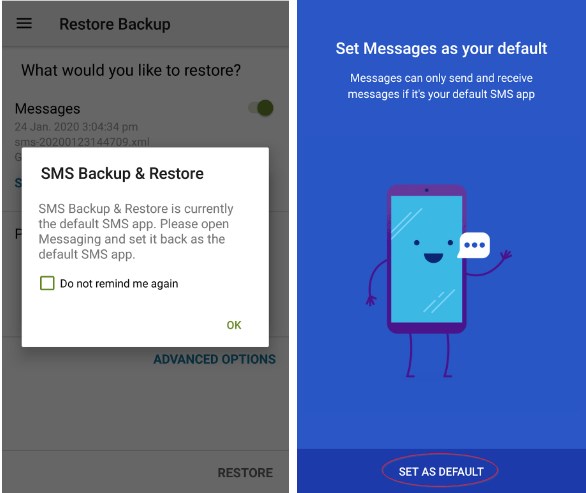
10. Once the backup is complete, you will then be reminded to switch back to your default messaging app. To do this, simply press the home button, select your normal SMS app, and accept any prompts to change messaging apps.
11. That’s it! Your messages should be restored.
Troubleshooting
Q. It tooks a long time to restore my messages, but when I open my messages app, there’s nothing there?
This can happen sometimes for very large SMS restores. To resolve this, we simply need to “clear data” for the app, which can be done by following the steps below on the majority of devices:
1. Open the “Settings” app on your device.
2. Scroll down and tap on “Apps” or “Manage Apps”
3. Scroll down and tap on the “Messages” app.
4. Tap on “Storage” and then select the “Clear Data” button. When prompted, tap “OK” to allow it to clear all data.
5. That’s it! Your messages app should now show your restored messages.
Generally speaking, it is best to consult our email migration guide. It is recommended to set up Gmail accounts with the Gmail app and Hotmail/Live Mail/Outlook.com accounts with the Outlook app. The reason for this is contact synchronisation – having all of your contacts available in one account.
Two Factor Authentication (2FA) Codes
If you use your device to store Two Factor Authentication codes there are some things you need to consider before changing or wiping your device.
1. We recommend using LastPass Authenticator, it is recommended to make sure your backups are working by going to the menu and checking the “Backup to LastPass” option.
2. Whilst Google Authenticator has the ability to move your 2FA codes to a new device, it does not appear to allow this if your device has been lost, stolen or wiped – it requires both your old and new device to be alive and accessible. As such, it is recommended that you sign into all the services that use 2FA codes and manually create codes into a new app that allows backups, such as LastPass Authenticator or Authy. I recommend LastPass Authenticator, especially if you use LastPass.
Whatsapp has its own backup and restore system. For Android devices, it is quite simple:
1. Open WhatApp > Settings > Chats > Chat Backup
2. Tap Backup to Google Drive, and select the google account you wish to backup to.
3. Tap ‘Backup over’ to select which networks you would like to use to backup Whatsapp.
4. Wait until it has successfully uploaded the data.
Integrated Backup Options in Android?
It is worth noting that Android 9.0 and later has introduced a native backup solution that, while not particularly comprehensive, is still a worthwhile function.
Currently Android actively backs up the following to your google account:
1. App data
2. Call History
3. Contacts
4. Certain device settings (Wi-Fi passwords, wallpapers and default apps)
5. Photos and Videos (through Google Photos)
SMS Messages, but not MMS messages
Migrating Data from iOS to Android via Google Services
Contacts
Due to Apple’s locked ecosystem, it’s actually a little tricky to migrate contacts to Google, but it is definitely doable. There are a few methods which are listed here, but for the most part I recommend merging contacts with iCloud, and then exporting from iCloud.com to be imported into Google Contacts. This means if you need to export contacts from iOS, you need both an Apple ID and a Google Account.
Firstly, check the accounts:
1. Go to Contacts. See if there is a “groups” button. If so, there may be multiple accounts setup.
2. If there are no groups, the contacts are just on the phone and need to be migrated to Google.
3. If there are other accounts apart from Google or iCloud, you will need to find a relevant guide for the service you need to export from (eg MS EAS/O365) otherwise follow the guide below
To migrate contacts from the device to iCloud:
1. Sign into an Apple ID on the device. If you do not have one, you will need to create one – feel free to use your Gmail address for this rather than setup a new iCloud account.
2. Go to iCloud sync settings and ensure that iCloud contacts are merged and synced.
To export from iCloud to Google Contacts
3. Go to www.icloud.com using your internet browser (Chrome, Firefox, Netscape Navigator 4.0 etc) and then login
4. Select all contacts, then export to vcard using the options button in the bottom left hand corner
5. Log into https://contacts.google.com and import the Vcard here, using the import button from menu column on the left. Delete the group (not needed, don’t worry it doesn’t delete contacts) once done.
Calendar
Essentially you need to have everything synced with iCloud, and then you need to export to an iCal file to be imported into Google Calendar. Full guide here.
Notes
Google Keep is our top pick for a note taking platform that is cross platform and free to use. Unlike Apple Notes, Google Keep works great across both Android and iOS. To move notes from Apple Notes to Google Keep, do the following on a laptop or desktop computer:
1. Ensure that your notes are synced to iCloud on your mobile device. You can check this in settings -> iCloud.
2. Sign into your iCloud account by going to https://www.icloud.com/#notes2
3. In a separate browser tab, sign into your Google Keep account by going to https://keep.google.com
4. For any notes that you wish to keep, cut and paste the content of the notes in iCloud Notes into Google Keep. To make this process as efficient as possible, I recommend splitting your screen into two Google Chrome windows, or using multiple monitors. Keep in mind that sensitive information such as passwords and banking details probably shouldn’t be stored in notes – use LastPass for this instead.
SMS/MMS
Backup
Moving these files over from an iPhone to an Android is slightly involved, but isn’t too difficult, with all things considered:
1. Connect and unlock your iPhone and connect it to your PC. When prompted on your device, select “Trust”.
2. Open iTunes. If iTunes asks whether you would like to setup as a new iPhone, or restore a previous backup, select “Setup as a new iPhone”.
3. Go to the iPhone Summary page. This can be done on clicking on the little iPhone icon, to the right of the drop down menu.
4. Ensure that “Encrypt local backup” is disabled, and create an iTunes backup on a Windows or Apple PC. See here for a full guide on iTunes backups. If you are unsure what the encryption password is, you may need to General -> Reset -> Reset all Settings on your iPhone.
5. Create a temporary folder somewhere on your PC for your data files (eg temp iPhone data). We will need this later.
6. After a few moments, your iTunes backup will complete. We will need to go to the storage folder for the iTunes backups:
On Windows, this is in %AppData%\Apple Computer\MobileSync\Backup\
On MacOS, this is in ~/Library/Application Support/MobileSync/Backup/
7. Go to the most recent folder for your recent iPhone backup.
8. Search (Control + F on windows devices, Command + F on macOS devices) for “3d0d7e5fb2ce288813306e4d4636395e047a3d28”. Copy the file that appears into the temporary folder you made earlier and rename it “smsbackup”.
9. Repeat this process for “5a4935c78a5255723f707230a451d79c540d2741”. Copy the file that appears into a temporary folder and rename it “callsbackup”.
10. If both files are under 25MB, you should be OK to attach this to an email going to a Gmail account. Otherwise you may need to use a Google Drive link.
Restore
To restore SMS and Call Logs on your Android device, perform the following:
1. Assuming you have your email account set up on your Android device, you can download the attachment from the email you sent yourself.
2. Download the “smsbackup” and “callsbackup” files attached to this message. They should download to the “downloads” folder on your device.
3. Download the iSMS2Droid application from the Google Play Store (Direct link: https://play.google.com/store/apps/details?id=org.faked.isms2droid&hl=en)
4. Once the app is installed, open the app and tap on “Import Messages”. Allow it any permissions that it asks for. When prompted, select the “smsbackup” file from your downloads folder. Depending on the quantity of messages you have, it may take some time to import.
5. Once the import is finished, go back and perform that same process for the call logs, if desired.
6. Done! You can delete the SMS backups and iSMS2Droid application now if you like.
7. Optional – setup SMS backups on your new phone using the “SMS Backup” app in the “system” folder on your Android device.
iMessages/Facetime
Please ensure that iMessages and FaceTime are turned off. This is because with them still enabled, all messages/video calls from other users on iOS will end up sent to your Apple account, rather than your new phone.
If you still have access to your iPhone
1. Open Settings>Messages
2. Turn off iMessage slider (So that the toggle is on the left hand side)
3. Go to Settings>FaceTime and turn off the FaceTime slider (So that the toggle is on the left hand side)
If you no longer have access to your iPhone
1. Go to http://selfsolve.apple.com/deregister-imessage from any web browser.
2. Scroll down to the second section labeled ‘No longer have your iPhone?’.
3. Enter the phone number you’d like to deactivate from iMessage and click Send Code.
4. Check your current phone for a text message and enter the code that you’re sent.
5. Wait for confirmation that iMessage has been deactivated.
On iOS it is a little more complex and at this stage there is no reliable method for backing up and restoring WhatsApp chats. There are several 3rd party applications that offer the service, however these seem to have mixed results and feedback so we can’t recommend any of them.
Best Practices on Setting up Apps for iOS
Assuming that your contacts, Calendars and email are setup via Gmail or G-Suite, then there are a few steps that you need to take to ensure that all your important data is syncing to your Google account. This way, when you setup your account on your new Android device, all of your info will be present
Other Devices
For all other devices, documentation is limited due to the fact that these devices are generally outdated and rare.
Dumbphones
Dig around the menus and options. More often than not you need to export to the SIM card (if they are not there already), and then pop the SIM into the new device and import. If the client has a lot of contacts, you may need to do this in stages, since SIMs only hold a limited amount of contacts before becoming full.
Windows Phone
The following guide has some pointers on making the switch from Windows Phone to Android as painless as possible. Provided you have the phone set up with a Microsoft account, this is all fairly straightforward and easy.
https://www.thewindowsclub.com/switch-from-windows-phone-to-android
iOS Setup Guide
Apple’s iOS operating system for iPhones and iPad is generally a simple mobile operating system for day-to-day usage, even if we find it restrictive compared to Android. There are a few steps that need to be taken to ensure that you can get the greatest level of functionality and cross-platform compatibility from your device.
iOS Setup - Getting Started
This guide is for anyone who has already had their data migrated from Apple services to either Google or Microsoft. If you currently have your contacts, calendars, notes and email stored either locally on your device or in iCloud, you will want to migrate this data before you follow the rest of this guide, otherwise you may lose access to your data.
Please note that this guide is current as of iOS 14.
iOS Setup - Clean Up of Stock Apps
It is recommended that we firstly clean up our device and remove a number of Apple services that we most likely won’t be needing, and can be served by apps provided by Google or Microsoft.
Please note that it is NOT mandatory that any of these apps be removed, but it is likely that they won’t be used, and fewer apps means that your device will generally run smoother, your homepages will be less cluttered and you will have more storage space available. If you have Apple products that rely on these apps for functionality (eg. Apple TV or Apple Watch) or there are services that you use frequently with an Apple Mac computer (eg. Reminders or Apple Music) then you should not remove apps that are needed for these services. A standard, out-of-the-box home screen that we will want to clean up will look a bit like this:
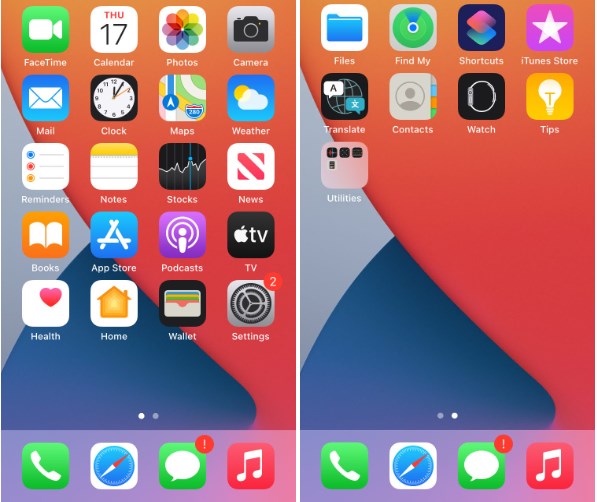
To remove an app, simply long press on an app on the home screen until the icons start to jiggle, and then tap the “-” icon to remove. You can re-install any of these apps in the future by searching for them on the App Store.
The list of suggested apps to remove, along a quick explainer why, is listed below:
1. Calendar – The Apple Calendar app lacks some important functionality when syncing to Google or Microsoft services, and both platforms have their own app, making this app redundant.
2. Mail – The Apple Mail app lacks some important functionality when syncing to Google or Microsoft services, and both platforms have their own app, making this app redundant.
3. Maps (Apple) – Apple Maps is often overshadowed by Google Maps in terms of navigational capabilities, especially for bicycle and public transit. Two map apps are not really needed, although Apple Maps does have better Siri and Apple Watch integration if you need it for that reason.
4. Reminders – Apple Reminders are only unique if you like the integration with Siri or a Mac, otherwise you usually will be served better by third party apps such as Google Keep, Microsoft To-Do, or business-specific software, which typically has more robust cross-platform support and feature sets.
5. Notes – Apple Notes is a simple note taking app with good support for sketching on iPad Pro models, but lacks the ability to sync notes to non-Apple devices. Most users will be better served by Google Keep or Microsoft OneNote.
6. Stocks – Few people actually use this app – if you use it, it’s OK to keep. Commsec Mobile and Marketwatch are common cross-platform alternatives.
7. News – Few people actually use this app – if you use it, it’s OK to keep. ABC News and Google News are common cross-platform alternatives.
8. Books – Few people actually use this app – if you use it, it’s OK to keep. Kindle reader is a common cross-platform alternative.
9. TV – This app is only for Apple TV owners. If you own an Apple TV Box, do not remove this.
10. Health – Unless you own an activity tracker (eg. Apple Watch, Fitbit, etc), few people actually use this app – if you use it, it’s OK to keep. MyFitnessPal is a common cross-platform alternative.
11. Home – This app is only for Apple HomeKit or HomePod users. If you do not own these, then you do not need this app.
12. iTunes Store – This app is only used for purchasing music. If you use another Music service such as Spotify, you do not need this app.
13. Translate – Apple’s Translate app offers some interesting features for Apple Watch and Airpod users, but is otherwise inferior in terms of functionality to Google Translate.
14. Watch – This app is only used for Apple Watch users.
15. Tips – This app offers some useful tips for first-time users, however it should be kept in mind that most of the suggestions focus around getting you to use more Apple services, so it’s usefulness is somewhat limited.
16. Apple Music – This app is primarily used for Apple’s music streaming service, and Apple’s only cross-platform app. Whilst this works quite well on iOS, some users report that this does not work as well on Android, and many users instead opt for Spotify, which offers comparable functionality with the inclusion of a free, ad-supported plan.
Now that the device has been cleaned up, we can now proceed with setting up our device for Google or Microsoft services, or a combination of both.
Gmail / Google Workspace - Setup Best Practices on iOS
Setting up Gmail or Google Workspace (email for yourdomain.com hosted by Google) on iOS can be summarised into two parts – the setup and configuration of the accounts signed into the device itself, and the installation and configuration of third party applications.
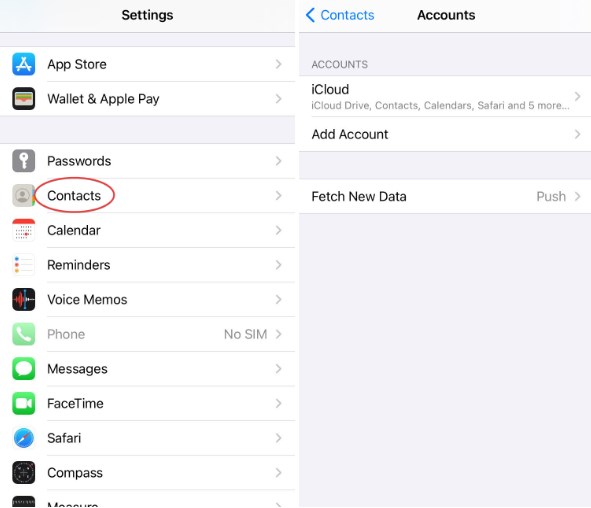
To set up either a standard Google / Gmail account or G-Suite on iOS, you will firstly need to add the account to the device in order for contacts to sync. To do this, open the settings Settings app, scroll down, and tap on “Contacts”.
Before we add our new account, it is highly suggested that we remove or disable any accounts, or account services, that are no longer needed, as these should be serviced by your Gmail / Google Workspaces account. Of course, if you have separate personal or business accounts that are not linked to your Gmail / Google Workspaces account, you should leave these accounts or services alone. Use the following checklist to ensure your accounts are configured appropriately.
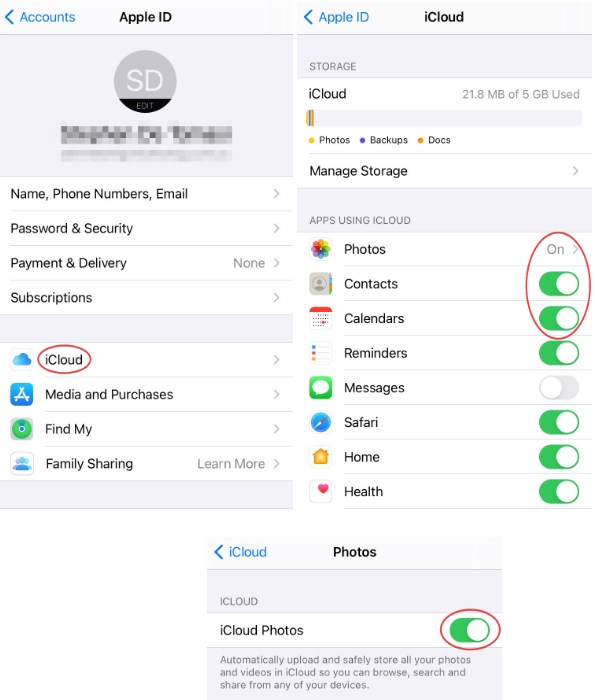
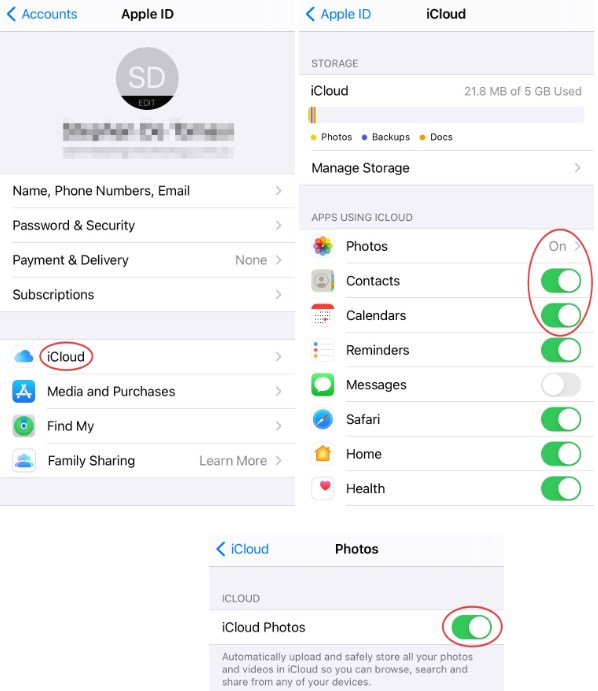
1. iCloud Account
a. Disable Contacts Sync
b. Disable Calendar Sync
c. Disable Apple Photos / iCloud Photos sync
2. Other accounts
a. Any other accounts (eg. Bigpond, Yahoo, Microsoft etc) should be removed or turned off (assuming they have been imported into Gmail / Google Workspace)
Go back to the main accounts screen, and then tap on “Add Account”. Select “Google” from the list, and then sign in with your Gmail / Google Workspace details.
Gmail / Google Workspace - Essential Apps
Now that accounts have been configured, we will need to download some additional apps. The following apps are ones that we would with consider to be essential (along with some setup instructions), or highly recommended for all users:
1. Gmail – Official Email client from Google.
a. Download app from the App Store.
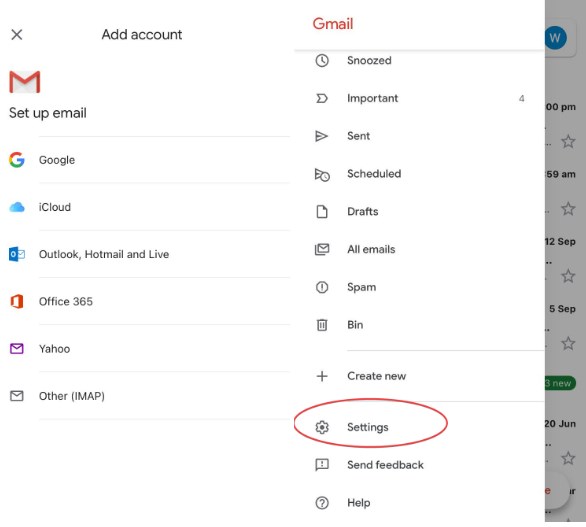
b. Open app, and sign in using “Google” account details.
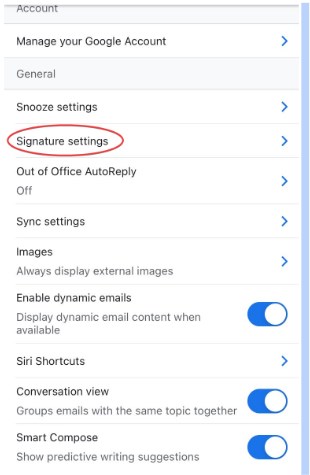
c. Once signed in, your email inbox will appear. In the top left hand corner is a menu symbol – tap this to reveal the menu details. Tap on “Settings” and configure your email account preferences, including your signature. If you wish to use the same signature as what you have been using on your desktop, you can always go to your sent box, and then copy your own signature, and then paste it in settings.
2. Google Calendar – Official Calendar app from Google.
a. Download app from the App Store.
b. Open app, and ensure your account is signed in. Grant any permissions that are requested.
c. Go to menu -> Settings and configure notifications as desired.
3. Google Drive – Cloud Storage by Google, for easy access to your files
a. Download app from the App Store.
b. Open app, and ensure your account is signed in. Grant any permissions that are requested.
c. You may need to download the Google Docs and Google Sheets apps (see below) for full functionality.
4. Google Photos – Photo backups by Google.
a. Download app from the App Store.
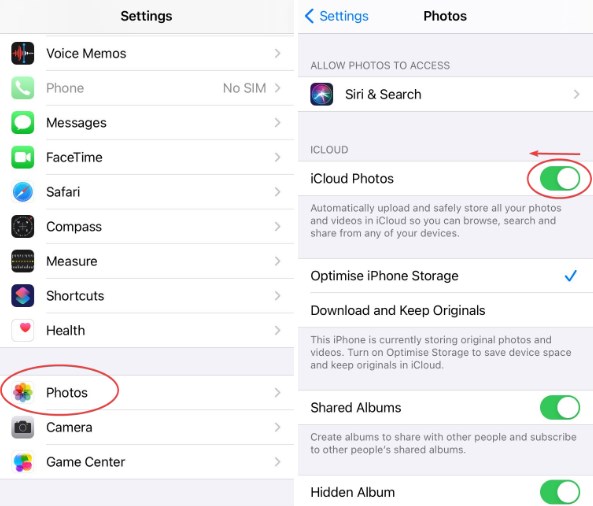
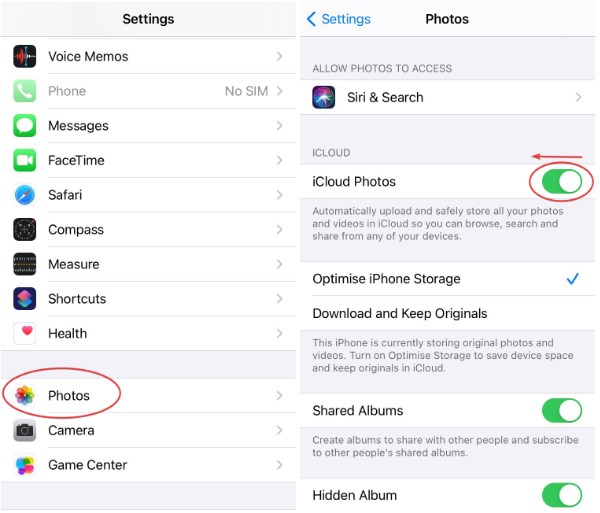
b. Check that iCloud Photo backups are disabled, as we won’t need this anymore, and it can sometimes interfere with Google Photos. To do this, go to Settings, scroll down to “Photos”, and then disable iCloud Backups.
c. Once iCloud Photos is disabled, Open Google Photos, and ensure your account is signed in and you grant it any permissions that it asks for.
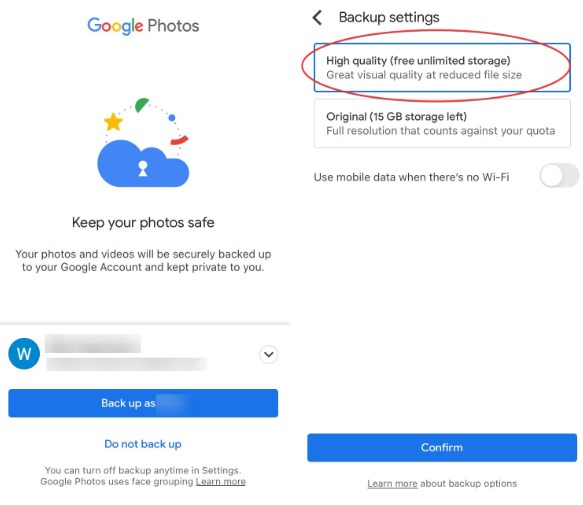
d. It is highly recommended to use the “High Quality” preset for free unlimited backups, as all iPhones as of 2020 take photos at less than 16 megapixels, and it will be almost imperceivable to notice any quality difference for most users.
5. Google Keep – Simple note taking app by Google.
a. Download app from the App Store.
b. Open app, and ensure your account is signed in.
c. Notes will sync to your account automatically, and you can access them from any computer by visiting https://keep.google.com
6. Google Maps – Official Google Maps app.
a. Download app from the App Store.
b. Open app, and ensure your account is signed in.
c. Go to Menu -> Settings. Configure your home and work locations for quick navigation.
Gmail / Google Workspace - Supplementary Apps
The following apps are not “essential”, however they do serve useful functions and are still recommended. Simply search for the following on the App Store for more information.
7. Google – Search by Google
a. Useful for Google Search history and Google Feed.
8. Google Assistant – Personal Assistance
a. Useful for quick voice commands and search.
9. Google Tasks – Simple To-do list
a. Integrates with Gmail.
10. Google Chrome – Browse the Web With Google
a. Essentially the same as Safari, but will sync your bookmarks with Chrome on a PC.
11. YouTube – Video Sharing Platform by Google
a. Great for watching our video tutorials! 🙂
12. YouTube Music – Personalized music streaming
a. Successor to Google Play Music, neat alternative to Apple Music and Spotify that lets you upload your own songs to your account.
13. Google Docs – Documents for Google Drive
a. Supplementary app to Google Drive – allows for document editing on the go, and can open Microsoft Office documents as well.
14. Google Sheets – Spreadsheets for Google Drive
a. Supplementary app to Google Drive – allows for spreadsheet editing on the go, and can open Microsoft Office spreadsheets as well.
Gmail / Google Workspaces - Organising the Home Screen
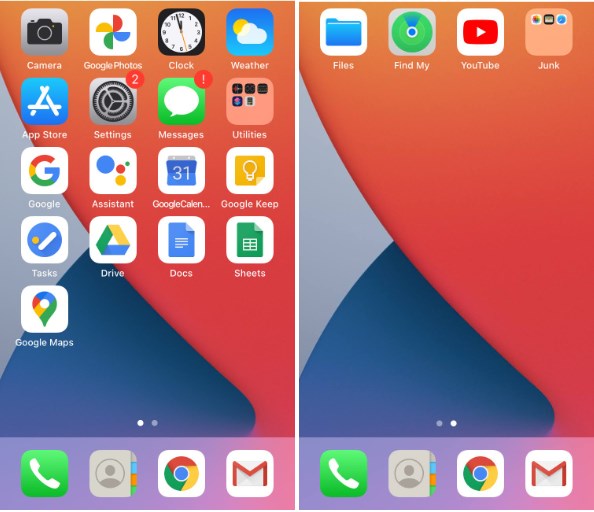
Now that we have set up our apps, it’s now a good time to organise the home screen. Below is an example of how a neat home screen looks like:
To achieve this layout, do the following:
1. The following apps should be placed in the dock:
a. Phone
b. Messages
c. Chrome
d. Gmail
2. Once that is done, organise your home screens.
a. Place the most commonly used apps right on the primary homescreen (eg. Google, Google Assistant, Gmail, Google Calendar, Google Keep, Google Drive and Google Maps).
b. Other apps that you use from time to time can go in a folder on the 1st or second home screen.
c. I do not recommend having more than three homescreens. If you sprawl across too many home screens, try setting up more folders.
d. Try to apply a theme to secondary homescreens to make things easier for you to find (eg. 1st page is for work and utilities, 2nd page is for media and games)
Microsoft Personal / Microsoft 365 for Business - Setup Best Practices
Setting up Microsoft Personal (Hotmail, Live.com, or Outlook.com) or Microsoft 365 for Business (email hosted for yourdomain.com by Microsoft) can be summarised into two parts – the setup and configuration of the accounts signed into the device itself, and the installation and configuration of third party applications.
To set up either Microsoft Personal or Microsoft 365 for Business on iOS, you will firstly need to add the account to the device in order for contacts to sync. To do this, open the settings Settings app, scroll down, and tap on “Contacts”.

Before we add our new account, it is highly suggested that we remove or disable any accounts, or account services, that are no longer needed, as these should be serviced by your Microsoft Personal / Microsoft 365 Business account. Of course, if you have separate unrelated personal or business accounts that are not integrated with your Microsoft Personal / Microsoft 365 Business account, you should leave these accounts or services alone. Use the following checklist to ensure your accounts are configured appropriately.
3. iCloud Account
a. Disable Contacts Sync
b. Disable Calendar Sync
c. Disable Apple Photos / iCloud Photos sync
4. Other accounts
a. Any other accounts (eg. Bigpond, Yahoo, Microsoft etc) should be removed or turned off (assuming they have been imported into Microsoft Personal / Microsoft 365 Business)
Go back to the main accounts screen, and then tap on “Add Account”. There are two options:
1. For Microsoft Personal (Hotmail, Live.com, Outlook.com) select “Outlook.com”
2. For Microsoft 365 Business, select “Microsoft Exchange”.
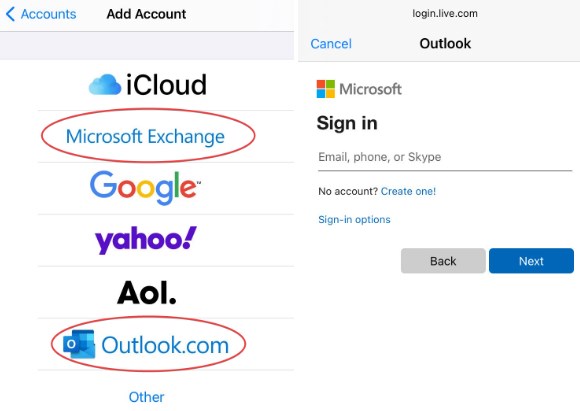
Enter your username and password. Once it has been accepted, you will get a choice as to what to sync. Untick Mail and Calendars, and leave contacts ticked.
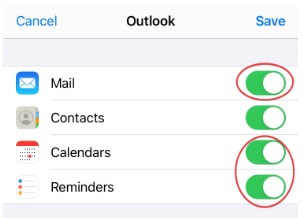
Done! Your Microsoft Contacts will now sync to the device, and we can now configure third party apps to sync the rest of your data.
Microsoft Personal / Microsoft 365 for Business - Essential Apps
Now that accounts have been configured, we will need to download some additional apps. The following apps are ones that we would consider to be essential (along with some setup instructions), or highly recommended for all users. We have added some comments on best setup practices where applicable:
1. Microsoft Outlook – Official Email and Calendar client from Microsoft
The official Microsoft Outlook app has superior functionality and integration compared to the standard Apple Mail app. To setup, download app from the App Store, and do the following:
a. Open app, and sign in with your Microsoft account details.

b. Once signed in, your email inbox will appear. In the top left hand corner is an account symbol. Tap on this to reveal the menu.
c. Tap on the Settings Cog in the bottom left hand corner to go to settings, where we will configure some additional settings.
d. Set default email app. For some reason you sometimes need to select this twice for it to take effect.
e. Configure your signature as required, or delete the default “Get Outlook for iOS”
f. Configure calendar settings (eg. Week start, Week numbers, etc)
g. Open Links with Microsoft Edge
h. Open Directions with Google Maps
2. Microsoft Office – Go-to app for Word, Excel & Powerpoint
a. Download app from the App Store.
b. Open app, and ensure your account is signed in. Grant any permissions that are requested.
2. Microsoft OneNote – Capture Notes, Ideas and Memos
a. Download app from the App Store.
b. Open app, and ensure your account is signed in. Grant any permissions that are requested.
3. Microsoft OneDrive – Access and backup files and photos
a. Download app from the App Store.
b. Open app, and ensure your account is signed in. Grant any permissions that are requested.
Microsoft 365 for Business - Essential Apps
These apps are specific for Microsoft 365 Business users.
1. Microsoft Teams – Microsoft 365 Business Chat & Collaboration
a. Download app from the App Store.
b. Open app, and ensure your account is signed in. Grant any permissions that are requested.
2. Microsoft Planner – Microsoft 365 Business Task Management Tool
a. Download app from the App Store.
b. Open app, and ensure your account is signed in. Grant any permissions that are requested.
3. Microsoft SharePoint – Microsoft 365 Business Document Management
a. Download app from the App Store.
b. Open app, and ensure your account is signed in. Grant any permissions that are requested.
Microsoft Personal / Microsoft 365 for Business - Recommended Apps
The following apps are not “essential”, however they do serve useful functions and are still recommended. Simply search for the following on the App Store for more information.
1. Microsoft Edge – Microsoft’s Web Browser
a. Download app from the App Store.
b. Open app, and ensure your account is signed in. Grant any permissions that are requested.
c. Go to settings, change search to Google. Change settings to reduce advertising and clutter.
2. Microsoft Todo – Simple Task Manager by Microsoft
a. Download app from the App Store.
b. Open app, and ensure your account is signed in. Grant any permissions that are requested
3. YouTube – Video Sharing Platform by Google
a. Great for watching our video tutorials! 🙂
4. Google Maps – Official Google Maps app.
a. Download app from the App Store.
b. Open app, and ensure your account is signed in.
c. Go to Menu -> Settings. Configure your home and work locations for quick navigation.
d. Go to Outlook and configure your default map app to “Google Maps.
5. Google Photos – Photo backups by Google.
a. Download app from the App Store.
b. Check that iCloud Photo backups are disabled, as we won’t need this anymore, and it can sometimes interfere with Google Photos. To do this, go to Settings, scroll down to “Photos”, and then disable iCloud Backups.
c. Once iCloud Photos is disabled, Open Google Photos, and ensure your account is signed in and you grant it any permissions that it asks for.
d. It is highly recommended to use the “High Quality” preset for free unlimited backups, as all iPhones as of 2020 take photos at less than 16 megapixels, and it will be almost imperceivable to notice any quality difference for most users.
Microsoft Personal / Microsoft 365 for Business - Organising Your Home Screen
Now that we have set up our apps, it’s now a good time to organise the home screen. Below is an example of how a neat home screen looks like:

Power User Options (Android Only)
This section is exclusively for Android users who are looking to get the most out of their device, and have root access configured via Magisk. If you don’t understand what that means, then this section may not be for you 🙂
Apps and settings
It depends, if root use titanium backup but do not restore system data. See my youtube guide: https://www.youtube.com/watch?v=9SEvOqypC2Y
Migrate App (XDA-Developers)
This process is for more advanced users and requires you to have special recovery software setup. This section can be skipped for most users.
TWRP manual installation script:
1. Download this script:
https://raw.githubusercontent.com/SayantanRC/baltiapps/master/manual_twrp_install.sh
2. Put this script under internal storage (/sdcard/)
3. Extract the migrate backup zip in, say, /sdcard/backup.
4. Go to TWRP main menu -> Mount -> Data and System
5. Go to TWRP main menu -> Advanced -> Terminal
OR Connect device to PC and open an ADB shell
6. Execute this script:
(the first parameter is the location of the extracted backup zip)
7. chmod +x /sdcard/manual_twrp_install.sh
8. sh /sdcard/manual_twrp_install.sh /sdcard/backup