Best Practices to Clean up your GMail / GSuite
Here are some tips for email management that can help you free up space in your inbox.
1. Create Folders, Labels or Tags in Gmail.
Folders help you streamline your inbox and boost email productivity. Keeping organised can help you ditch email that is unimportant.
Creating Labels helps you categorise your Gmail. Unlike folders, you can create multiple labels and apply them to emails. In this way, you’ll be able to search for them quite easily.
A more practical example of using labels is auto sorting invoices and receipts into a “Purchase records” label or something similar.
Click here for more information on Labels.
2. Delete Emails using Google Search
Erase old emails
The Gmail search box can help you find older messages that you’re never going to look at again. Just type older_than:2y in your Google Search bar to see all emails from more than two years ago. The page can only view 100 items at a time. You can select all, hit the trash button, and they’re gone forever or you can cherry pick which ones you want to remove.
Note: You can change the value of 2y to any number of years you want to view. For example 3y for 3 years, 4y for 3 years and so on. Also, please be careful using this feature if you have old emails you need to keep, old invoices that you might need one day.
Check out this video on how to search Google by date.
Search by size
You can now search for emails by size in Gmail. Enter larger:5m to find email messages that are 5MB or above, or open up the search drop-down dialog and use the size option there.
Note: Just like with 2y, you can change the value of 5m to any number you like to filter smaller or larger emails.
3. Take advantage of Google Storage Manager
You can use this tool to preview and delete large files across all your Google Apps.
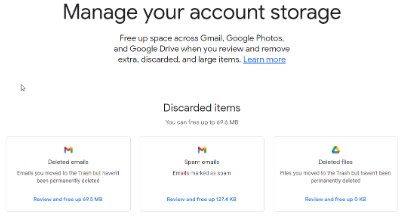
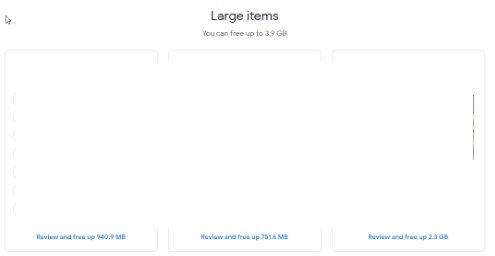
You can check Discarded items and Large items and see if you can completely remove them.
4. Archive Gmail emails using Google Takeout
Google created Google Takeout feature to help users backup the Gmail storage by archiving Gmail emails into a particular file format and saving them to any local drive you wish.
Best Practices to Clean up your OneDrive
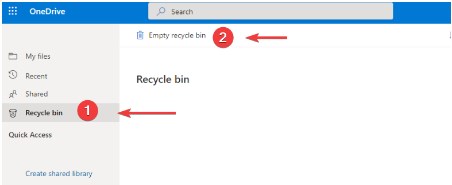
1. Empty the Recycle Bin
Just like any regular desktop, OneDrive has its own Recycle Bin folder. The files deleted from OneDrive are kept in the OneDrive Recycle Bin before they are removed forever.
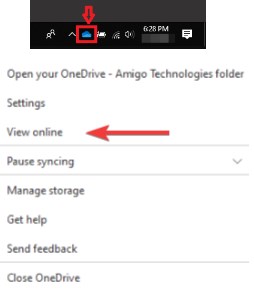
To check and see if you have any files stored inside the recycle bin, search for the blue cloud icon in the Windows notification area, right click > View Online.
Once you are logged in, click “Recycle bin” on the left-hand side and then “Empty recycle bin”.
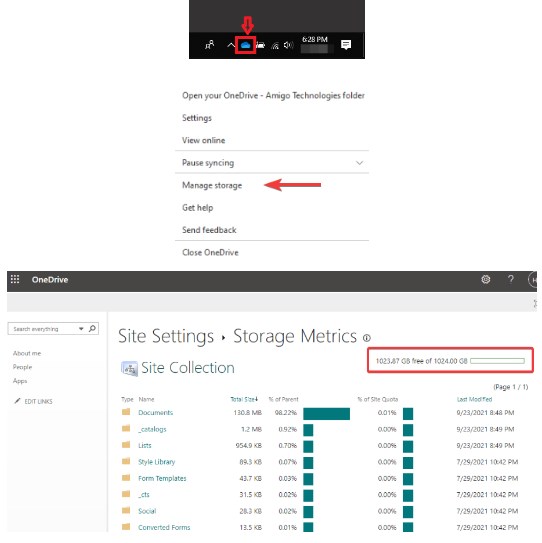
2. Monitor the size of your OneDrive.
We would recommend using TreeSize on the OneDrive folder to find out how much is stored in it.
The Storage Metrics page is also a good tool that allows you to view the size of each item stored in your OneDrive, and the percentage of available storage left.
Here’s how to get to OneDrive Storage Metrics. Search for the blue cloud icon in the Windows notification area, right click > Manage storage.
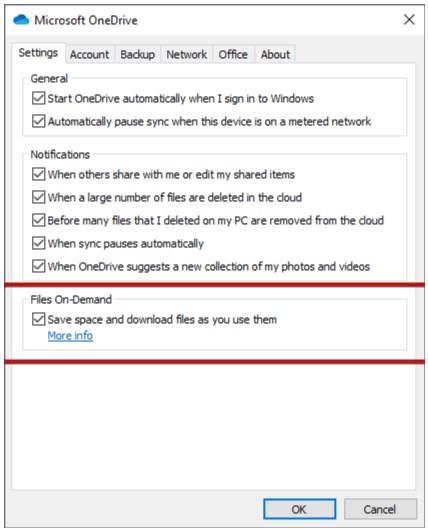
3. OneDrive Files On-Demand
Enable Files On-Demand to save space. This feature will make your files online only thus making more space for your local computer.
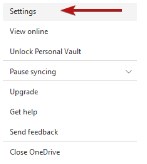
To enable Files On-Demand, search for the blue cloud icon in the Windows notification area, right-click > Settings.
Select the Settings tab and tick the box that says ‘Save space and download files as you use them’ then hit OK.
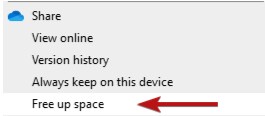
If you open an online-only file, it will download that file and will become a locally available file. You may then open this file even without the Internet. You may change it back to online-only by right clicking the file and selecting “Free up space”.
Please follow the link to learn more about OneDrive Files On-Demand.
4. Check documents shared by you.
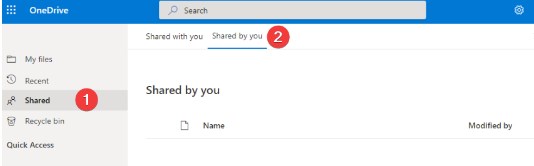
You may have shared documents that might no longer need collaboration. To check them, follow step 1 and click View Online. Click Shared > Shared by you. From here, you may decide to move the documents to other folders or remove them altogether, which should free up some space.
Best Practices to Clean up your Outlook.com mailbox
Please note that this guide applies to hotmail and live.com email addresses too, and these tips only work when accessing email from Outlook.com and not on the local Outlook app on Windows.
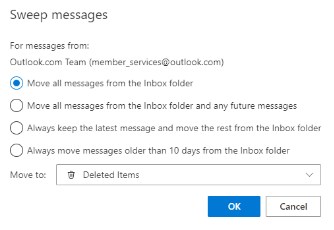
1. Use Outlook web app Sweep feature
Sweep allows you to quickly delete any unwanted email in your mailbox. This tool gives you neat options such as automatically removing your email older than 10 days, deleting all inbound email from a particular sender automatically, or you may opt to keep only the latest email from that sender.
To utilise this feature, choose an email from the sender in your Inbox that you want to delete and click on Sweep on the menu bar. Note: Sweep is not available in Junk Email, Drafts, Sent Items, and Deleted Items folders.

Choose from the list of options on how you want to handle the emails from that sender then select Sweep to perform the action.
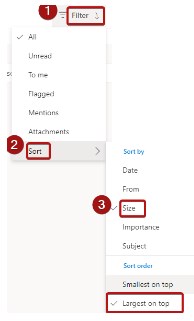
2. Use Filter to find large emails
Sort your email to easily find emails with attachments that are taking up space in your mailbox.To do this, click on the Filter button on the top right corner of your email folder. A drop down menu will show then navigate to Sort > Size. It will automatically sort your emails with the largest on top.
3. Use Simple Rules to filter emails
There are many ways that a rule can be made on your mailbox that help you move, sort, flag, mark, delete or handle an email automatically.
For this instance, we recommend creating a rule that moves an email from someone to a specified folder automatically.
To create a rule, go to Settings> View All Outlook Settings> Rules > Add New Rule
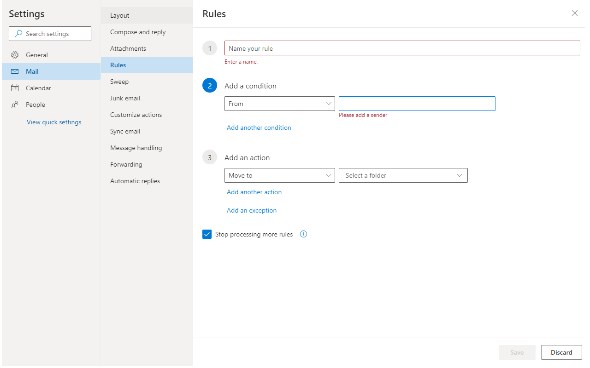
The first field is for creating a title or a label for your rule. Next step is to select the condition. In this instance, we would choose From from the list then enter the email address of the person / organization that you want to create this rule for. The third step is where you add the action, which is Move to then select the folder which you have created for this rule. Once this has been set, all emails from this particular email address will be moved automatically to the specified folder.
Please click here for more tips on creating rules for Outlook.com.
4. Use Archive feature
Using the Archive button moves your messages to the Archive folder making your Inbox more organized while keeping non-urgent messages out of your sight. This is good for emails that you don’t want to delete and might be needing again in the future. However, using the Archive button doesn’t reduce the size of your mailbox. Archived emails are easy to find using the search box and also by going to the Archive folder. Note: The Archive folder is one of the folders in Outlook.com that can’t be deleted along with Inbox and Sent Items folder.
To Archive an email, select the email you want to archive and then select Archive button from the list of actions above.

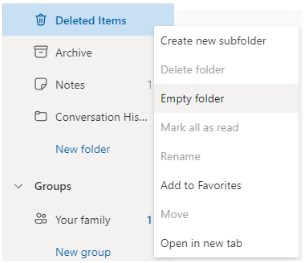
5. Empty Deleted Items folder
We would suggest empty your Deleted Items folder to free up more space in your mailbox. Keeping emails inside this folder is a bad habit. If left unchecked, this folder could get a big chunk out of your mailbox storage. Please make sure that this folder gets emptied regularly.